How to whitelist an email in Gmail, Outlook, and Tuta Mail in 2025
Whitelisting an email address in popular email providers on iPhone, Android, & desktop ensures emails from this sender do not end up in spam. Learn how this works in our guide.
What does it mean to whitelist an email
While most important emails do arrive in your inbox, sometimes they do get blacklisted and sent to the junk or spam folder by accident. Whitelisting the address is a quick and easy solution to make sure emails from specific domains or senders always arrive in your inbox. Whitelisting an email address or domain or creating a safe sender, simply adds the address to a list that ensures the recipient address sends to your inbox – this is especially useful for emails from services you sign up for or newsletters you subscribe to which often get marked as spam by automatic filters.
How to whitelist an email in Tuta Mail
Whitelisting emails in your end-to-end encrypted mailbox is quick and easy in Tuta Mail. Unlike Gmail and Outlook which don’t let you set up a whitelist or safe sender in the settings of their mobile apps, Tuta Mail does allow you to whitelist email addresses and domains on all clients, even in its iOS and Android apps.
At Tuta, we take special care about feature-parity in all our apps so for instance conversation view is available on all Tuta apps, and the same is true for the Tuta settings. Almost all functionalities that are available on browser and desktop are also available on the mobile apps. This is unique in the email space and makes Tuta one of the most convenient-to-use email providers.
Below we walk you through the steps how to whitelist specific senders or entire domains in Tuta Mail on iPhone, Android, desktop, and via Tuta Mail on browser.
Tuta Mail on iPhone
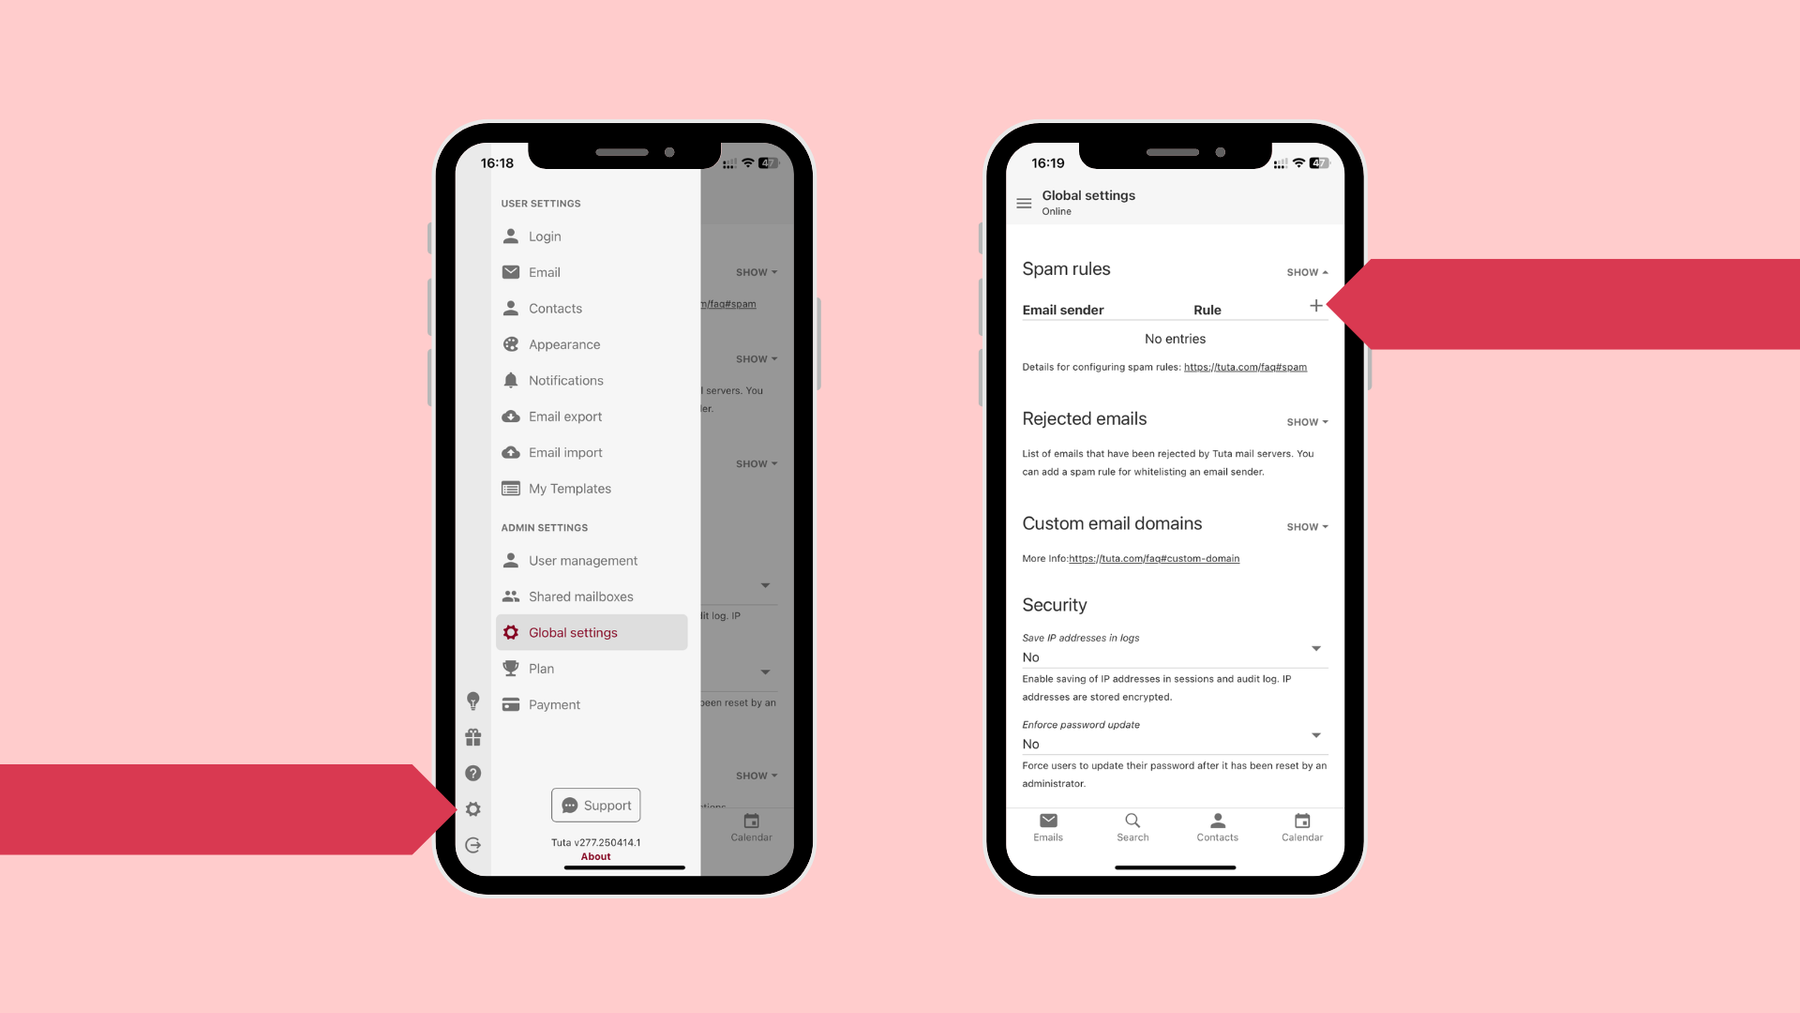
- From Tuta Mail on iPhone click on the hamburger menu in the top left corner
- Click on the settings gear icon
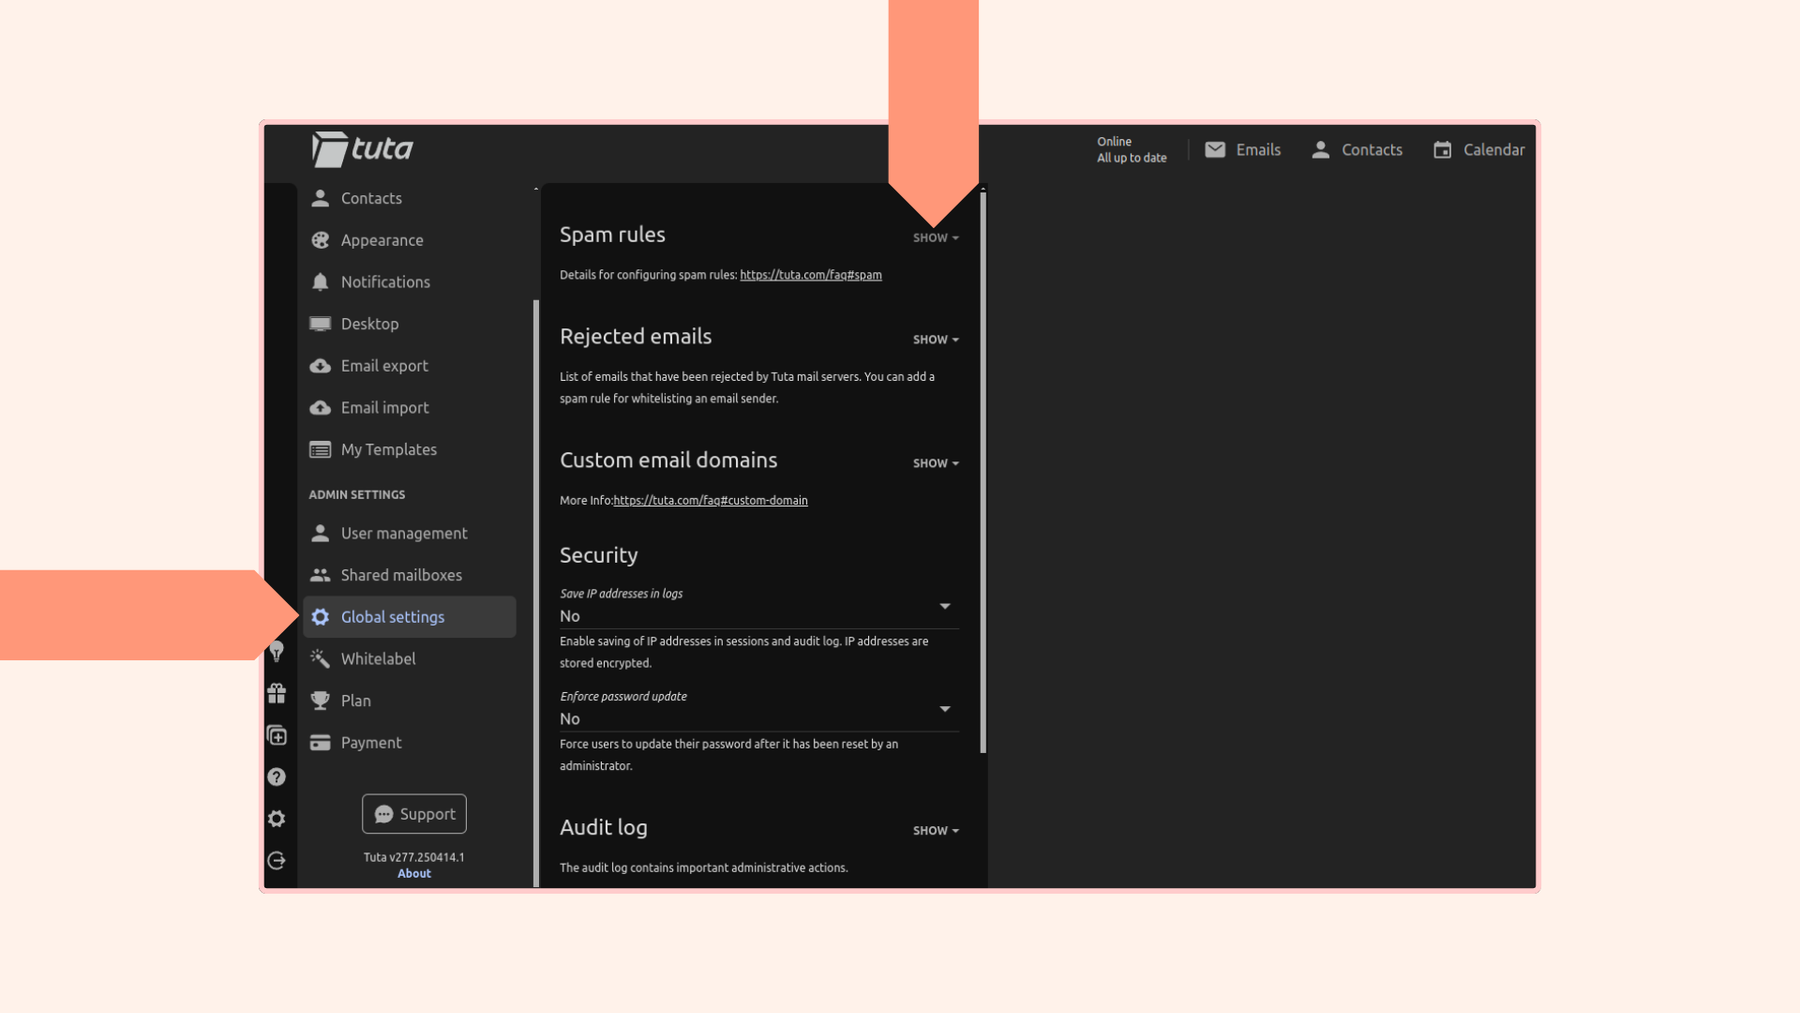
- Under User Settings click Global Settings
- Click on Spam rules
- Click the plus symbol
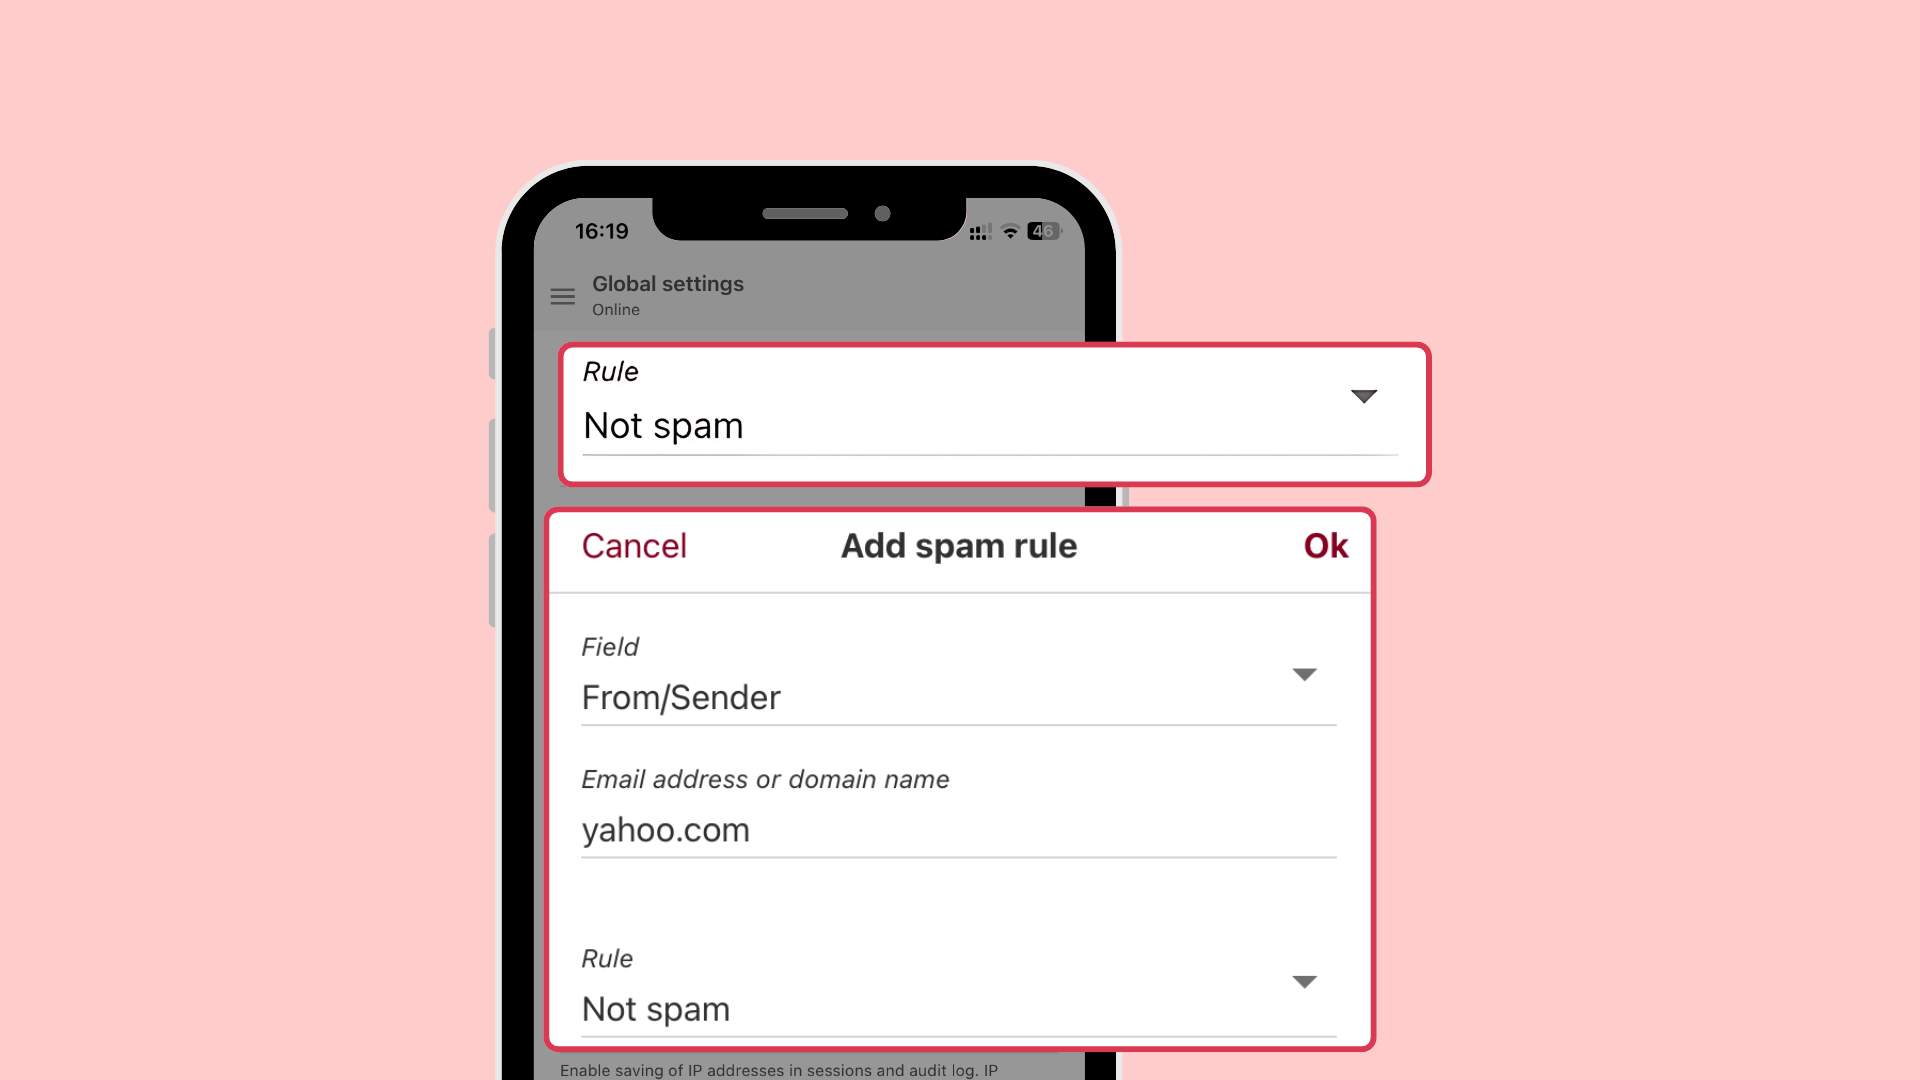
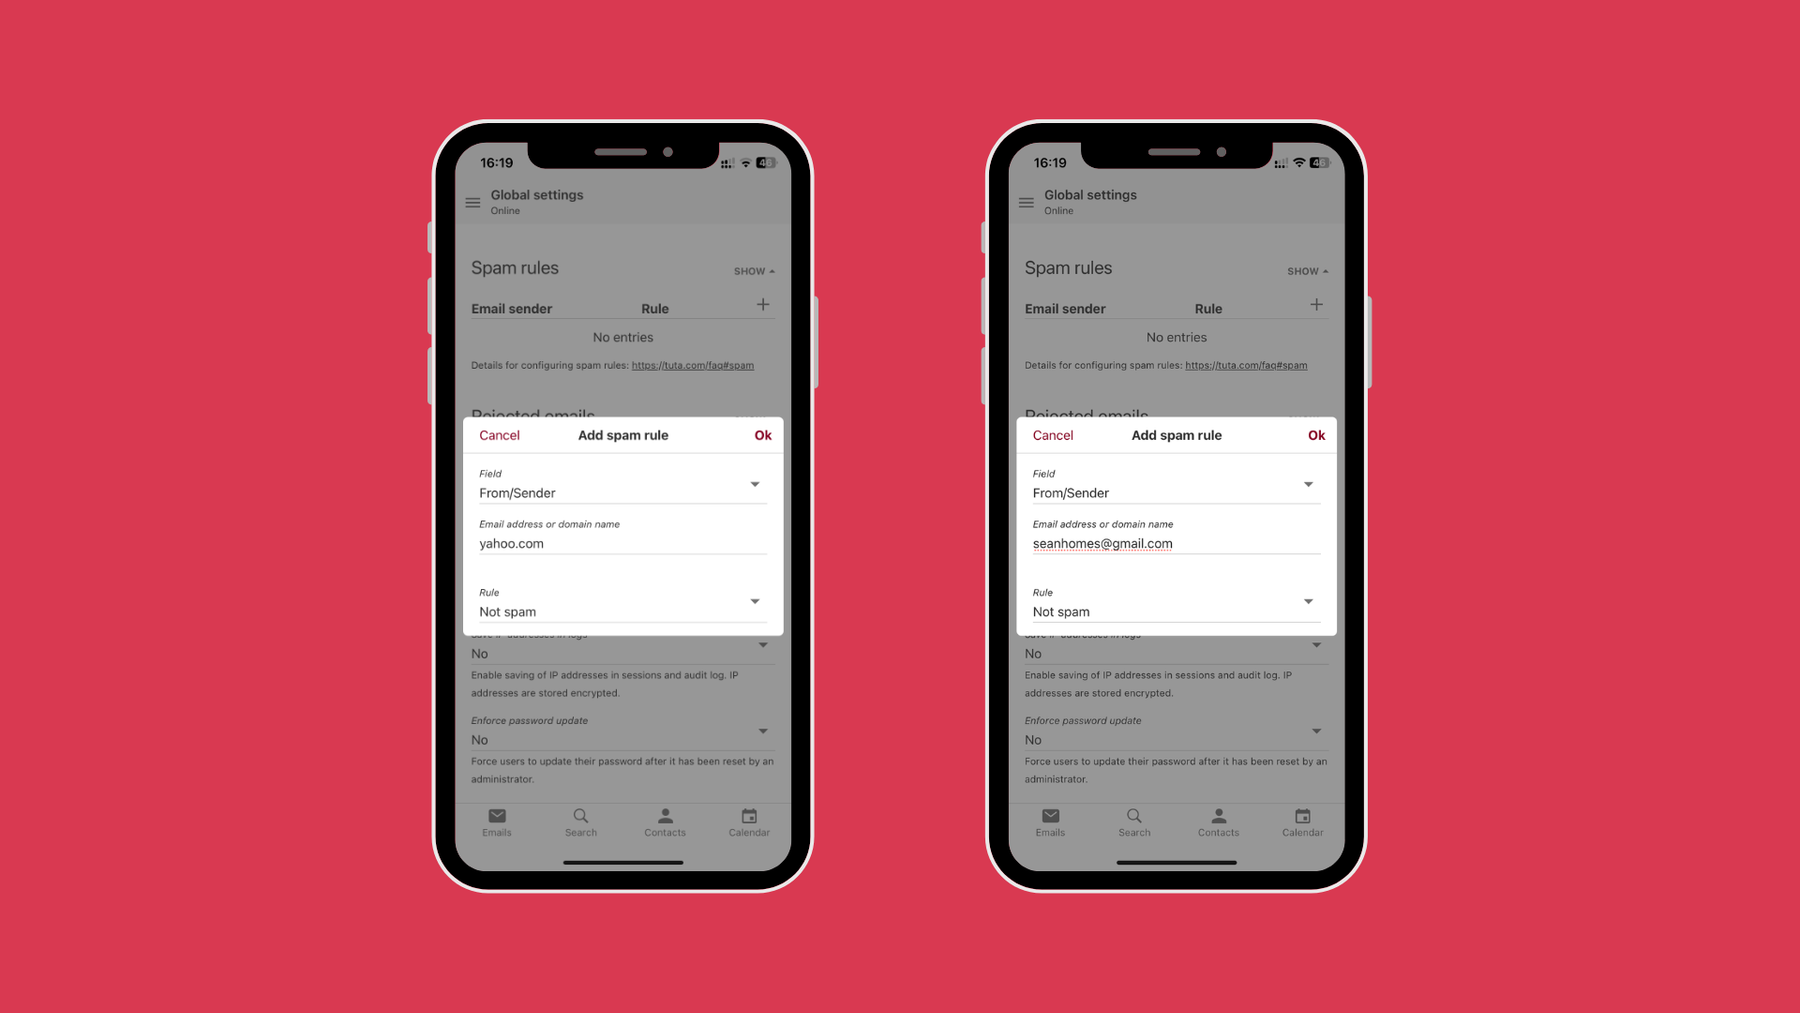
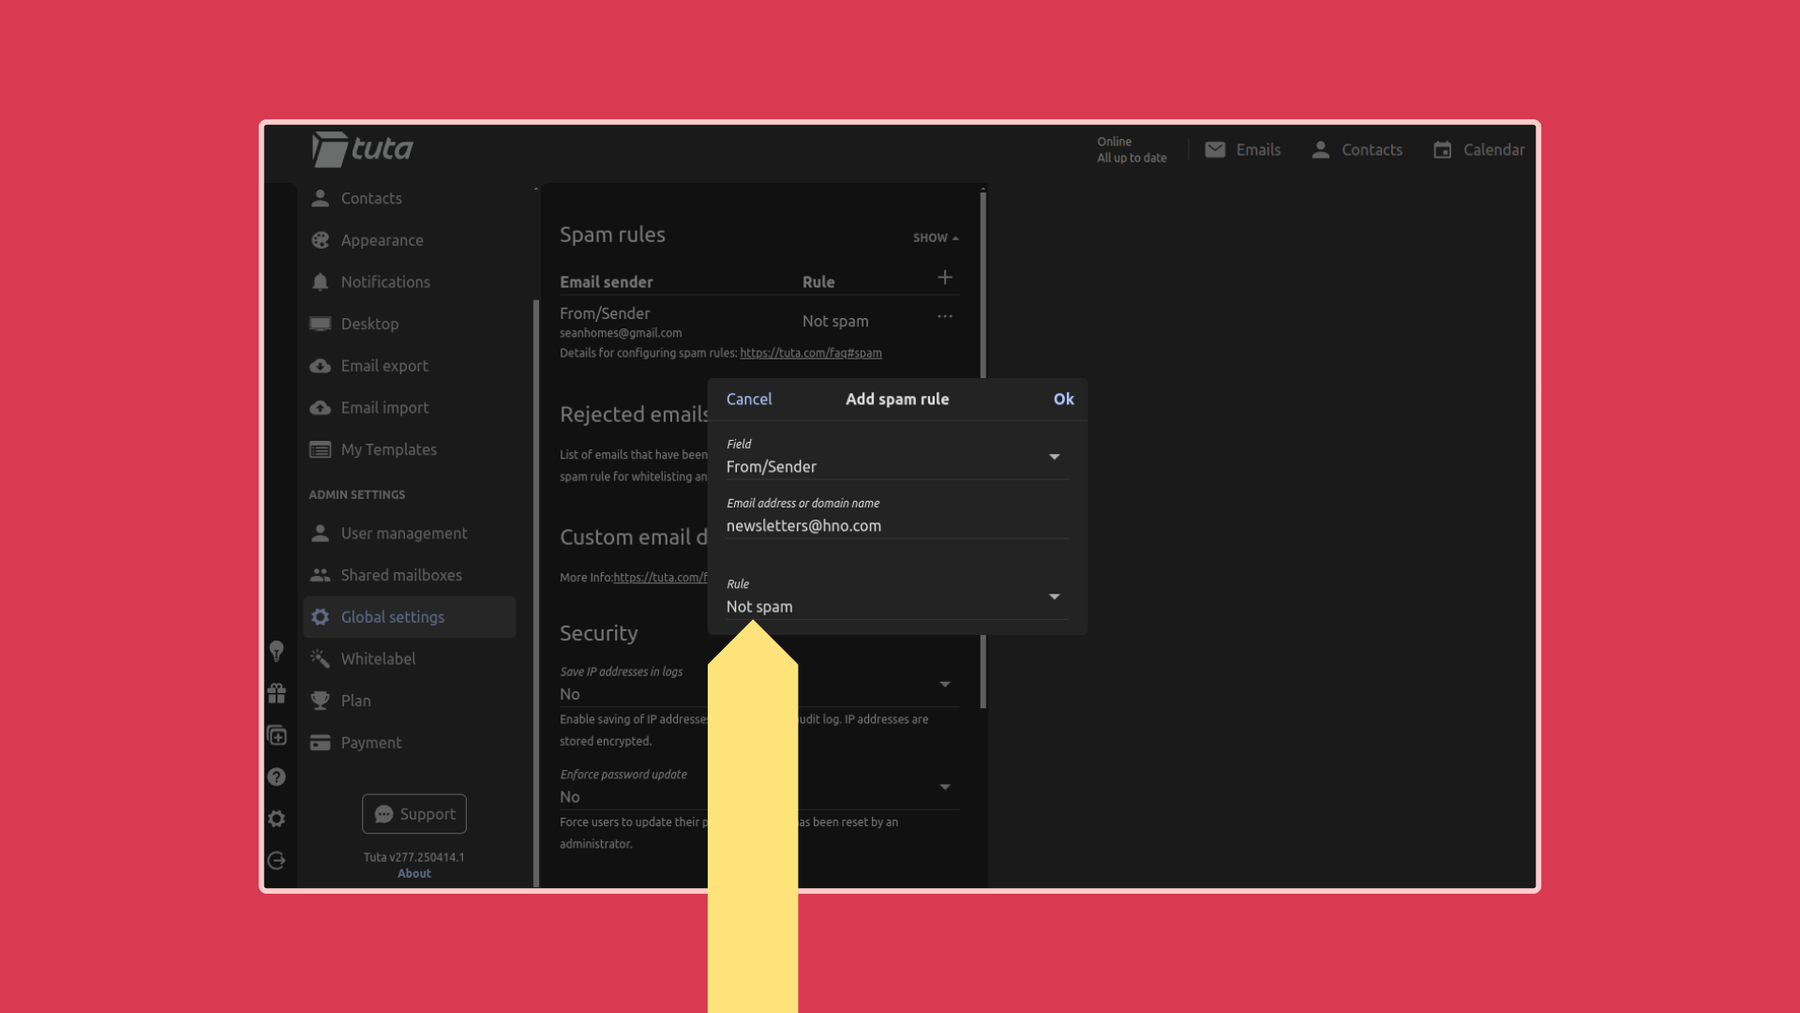
- Under Field select From/Sender
- Under Email address or domain name enter the recipients address or a domain (e.g. yahoo.com)
- Under Rule select Not spam
Tuta Mail whitelist tip: If you’d like to whitelist a single email recipient, enter the full address. If you’d like to whitelist a domain, just type the domain without the @., for example, gmx.com.
In Tuta Mail you can whitelist an individual email address or entire domain quick and easy in its app on iPhone or Android.
Extra tip: While you’re whitelisting an address under Spam rules, you can also set up spam rules to send certain emails to spam or even to discard them entirely.
Tuta Mail on Android
Whitelisting an email address in the Tuta Mail Android app works exactly as it does in the Tuta Mail iOS app:
- From Tuta Mail on Android click on the hamburger menu in the top left corner
- Click on the settings gear icon
- Under User Settings click Global Settings
- Click on Spam rules
- Click the plus symbol
- Under Field select From/Sender
- Under Email address or domain name enter the recipients address or a domain (e.g. yahoo.com)
- Under Rule select Not spam
Tuta Mail on desktop
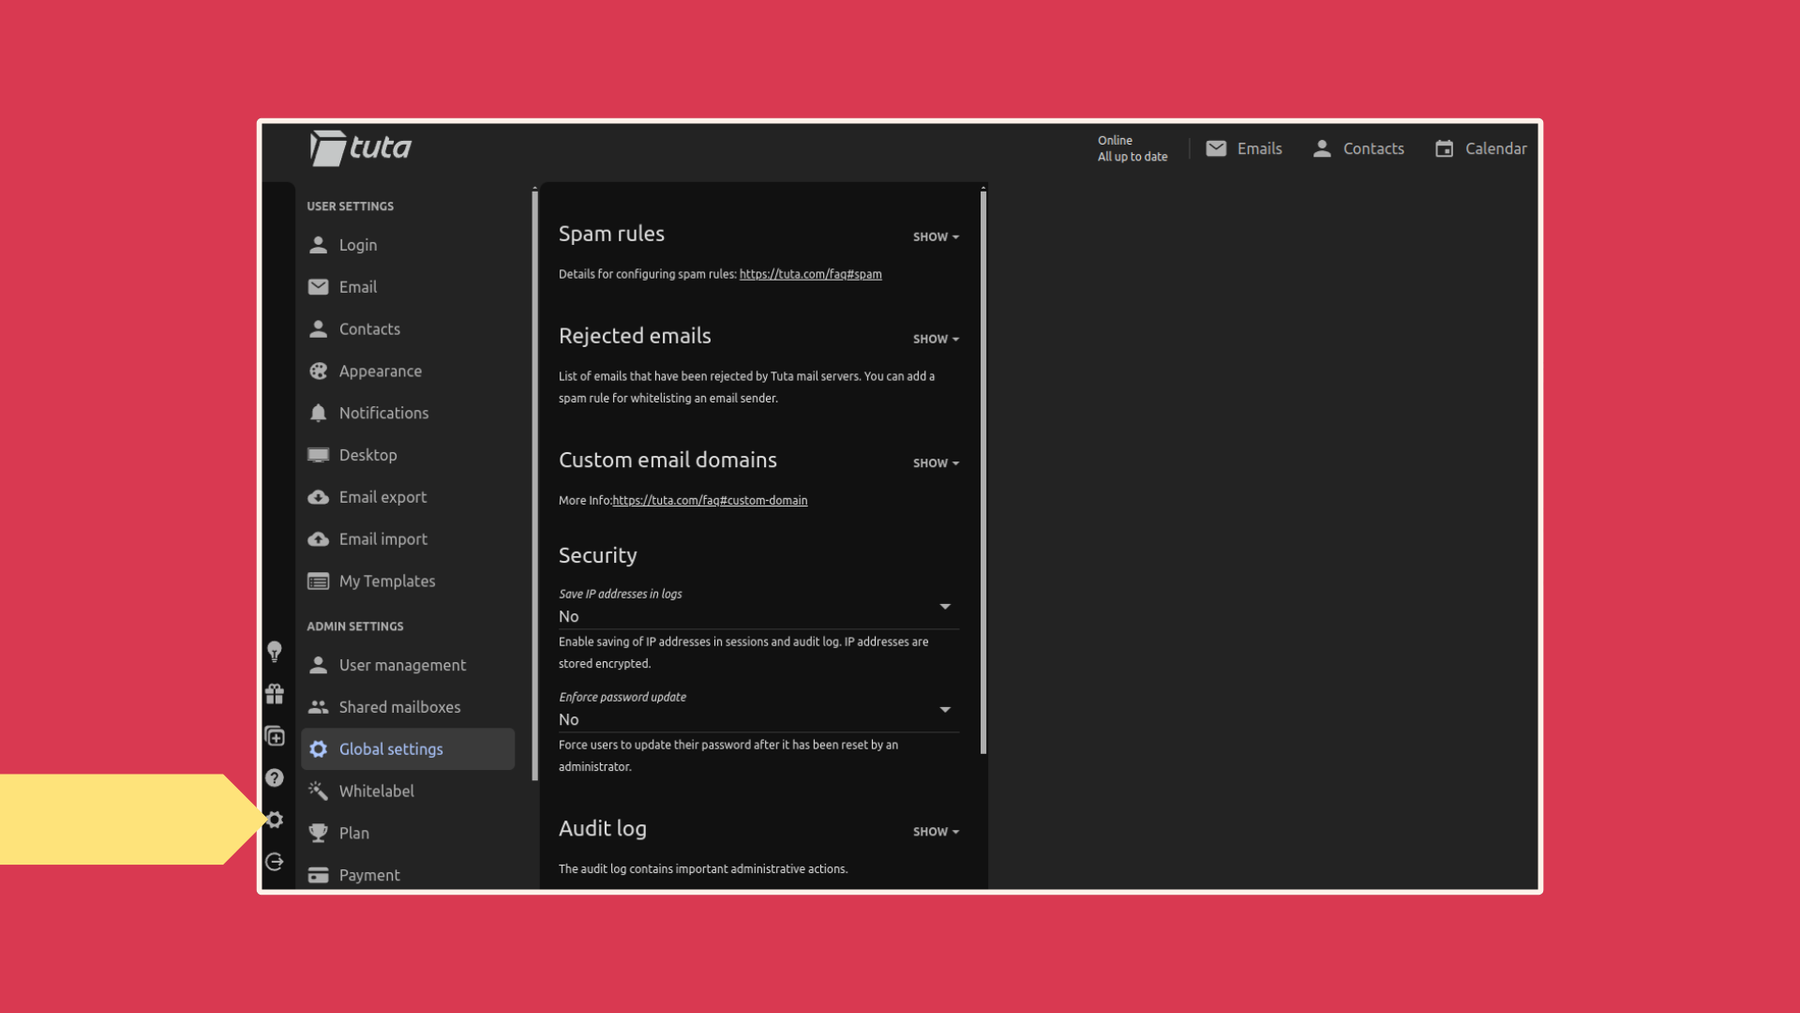
Setting up whitelist spam rules on desktop in Tuta Mail works in the same way as on the mobile apps. Please see the step-by-step guide above and check the images slideshow below!
In the Tuta Mail app on desktop or through a browser you can whitelist individual email addresses or entire domains.
Want more for your email? Use Tuta Mail’s alias addresses to stop spam, boost security, and improve you mailbox organization.
Tuta Mail in browser
Again, whether you use Tuta Mail in a browser, with the free desktop clients or with the mobile apps for Android or on iPhone, the steps to set up a whitelist rule are always the same. So, please check the steps above, or even better, yet, sign up for a free Tuta Mail account now!
How to whitelist email in Gmail
If you still use Gmail, even with all its annoying ads, you can create a filter to ensure an address or domain is whitelisted and always arrives in your inbox. Additionally, you can add the recipient’s address to your Google Contacts as this trains Google to know it’s a legit sender, although this does not guarantee that the emails will always be sent to your inbox. Let’s take a look at how you can whitelist emails in Gmail on iPhone, Android, or web version.
How do I whitelist an email in Gmail?
- Open Gmail from the browser of your choice.
- Click on the setting gear icon in the top right corner
- Click See all settings
- Click Filters and blocked addresses
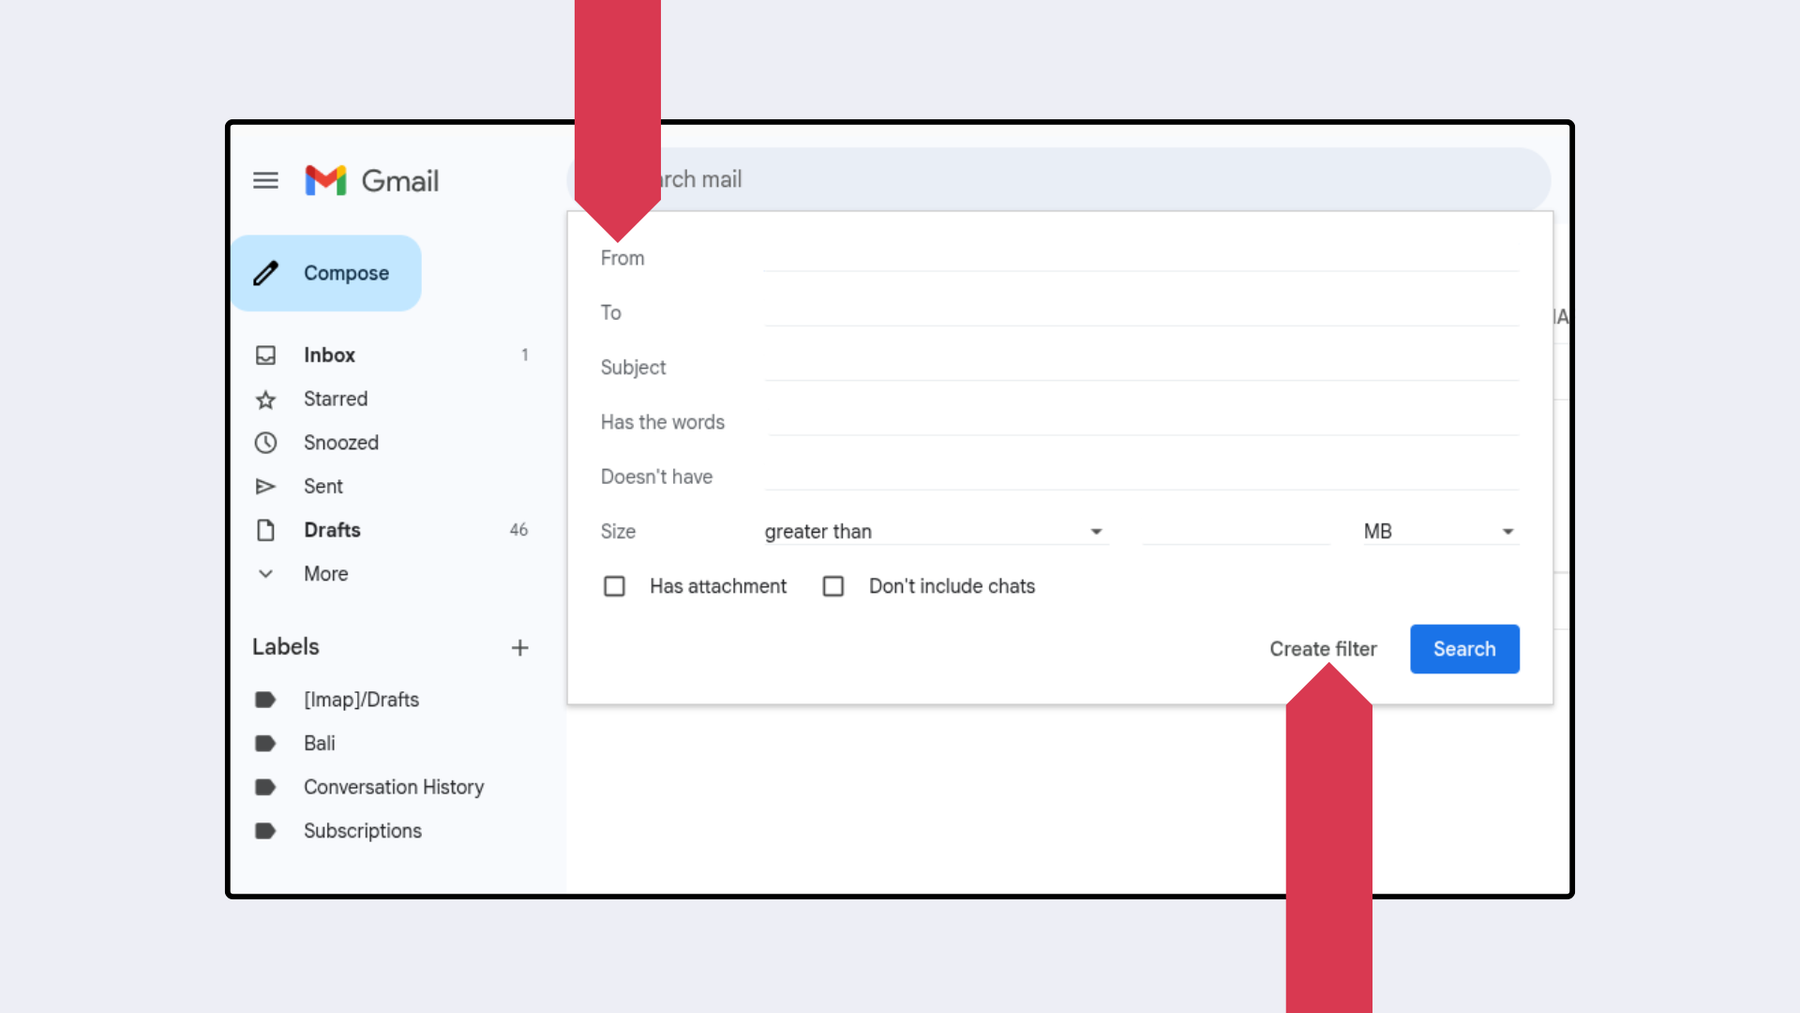
- Click Create new filter
- Under From enter the recipient address
- Click Create filter
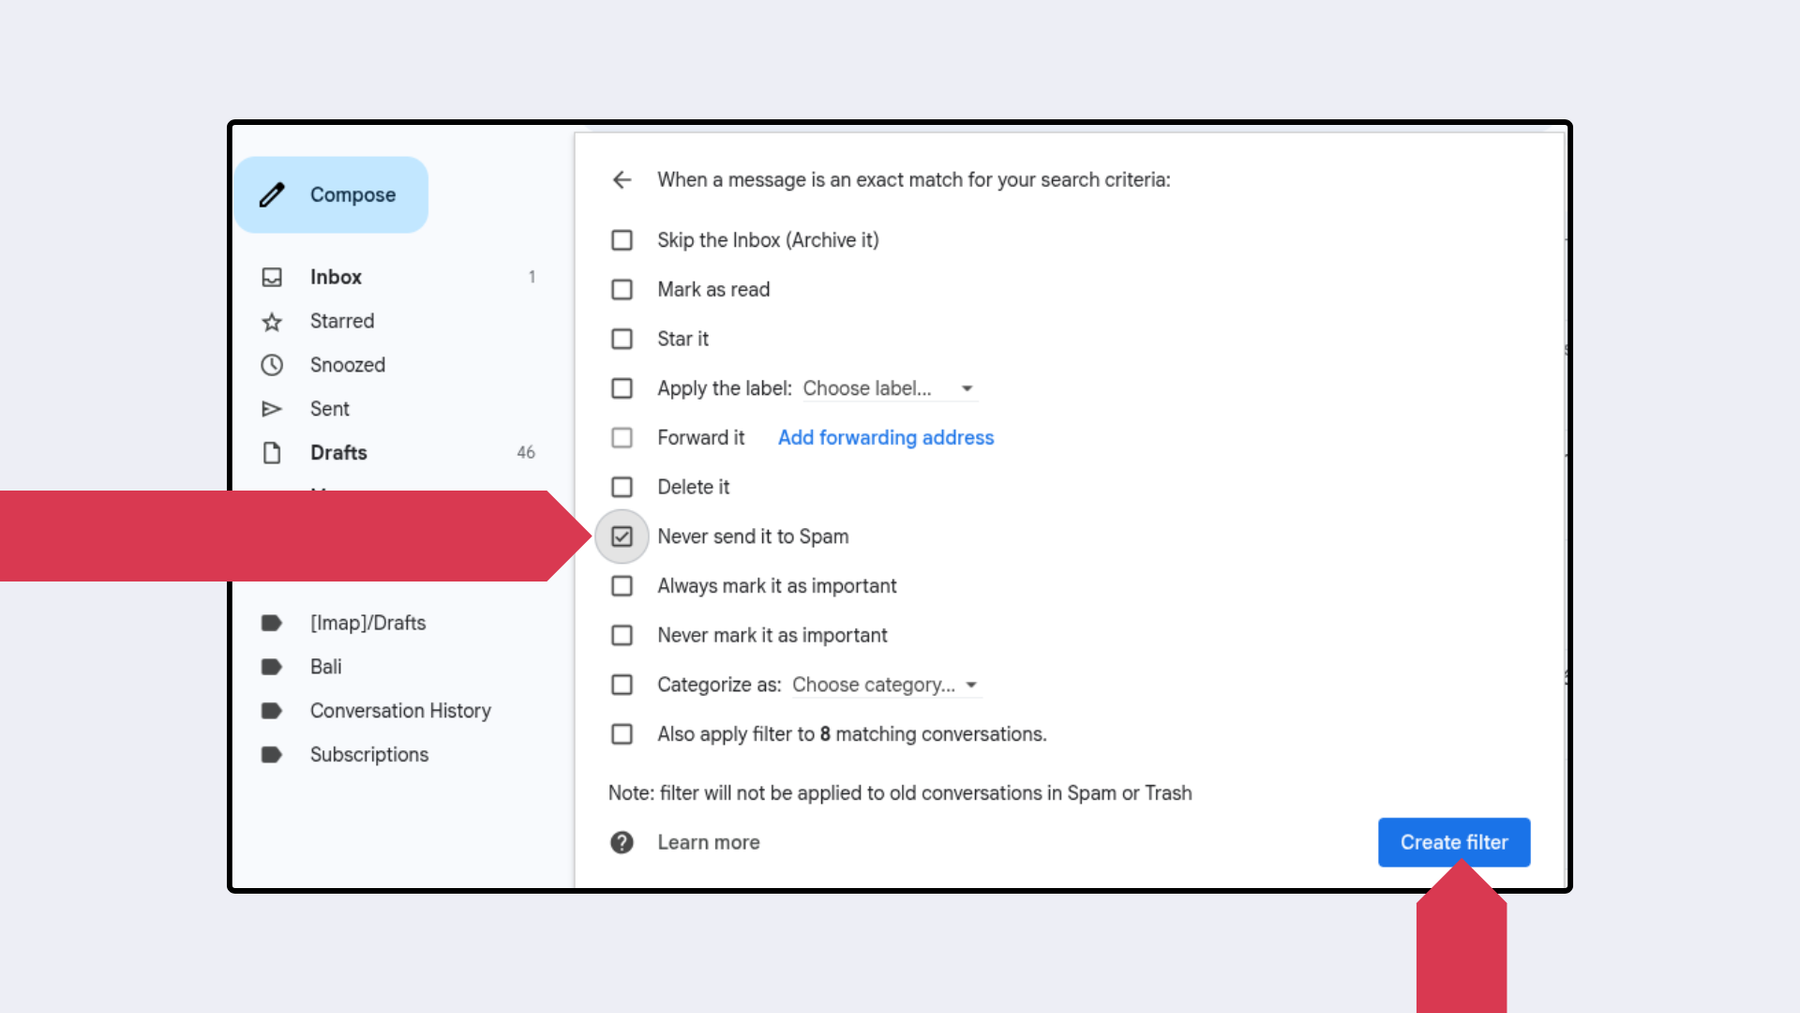
- Select Never send it to spam
- Click Create filter
If you’re a Gmail user, you’ll need to whitelist emails by creating a filter from within Gmail on a browser.
Gmail whitelist tip: If you’d like to whitelist a single email recipient, enter the full address. If you’d like to whitelist a domain, just type the domain, for example @tuta.com.
Whitelist emails in Gmail app on iPhone
Unlike the Tuta Mail app on iPhone, the Gmail app on iPhone does not allow you to create filter rules to whitelist an address, but you can report email as not spam which will move it to your inbox and influence Gmail’s automatic spam filtering. Note that this will not make sure that emails from these senders will always land in your inbox, it will only increase the likelihood that they do.
- Open the Gmail app on your iPhone
- Go to your Spam or Junk folder
- Open the email you want to send you inbox
- Click Report not spam
Learn why people are deGoogling, and choosing Tuta Mail as the best Gmail alternative.
Whitelist emails in Gmail app on Android
Android user’s also cannot create filter rules directly in the Gmail app for Android but can report email as not spam.
- Open the Gmail app on your Android
- Go to your Spam or Junk folder
- Open the email you want to send you inbox
- Click Report not spam
How to whitelist email in Outlook
In Outlook, you can whitelist a recipient’s address or domain name by adding it to a Safe Sender list. It’s worth noting that unlike the Tuta Mail mobile apps, in the Outlook Mail app on iPhone and Android you can’t create a Safe Sender in settings, but you do have the option to add the address you want to whitelist as a contact. This will also prevent the sender address from going to your spam or junk mail.
Let’s take a look at how to add a recipient to the safe sender list step-by-step in Outlook in browser and desktop and how to create a safe sender by creating a contact on iPhone and Android.
How do you whitelist an email in Outlook on Web?
- Open Outlook from the browser of your choice
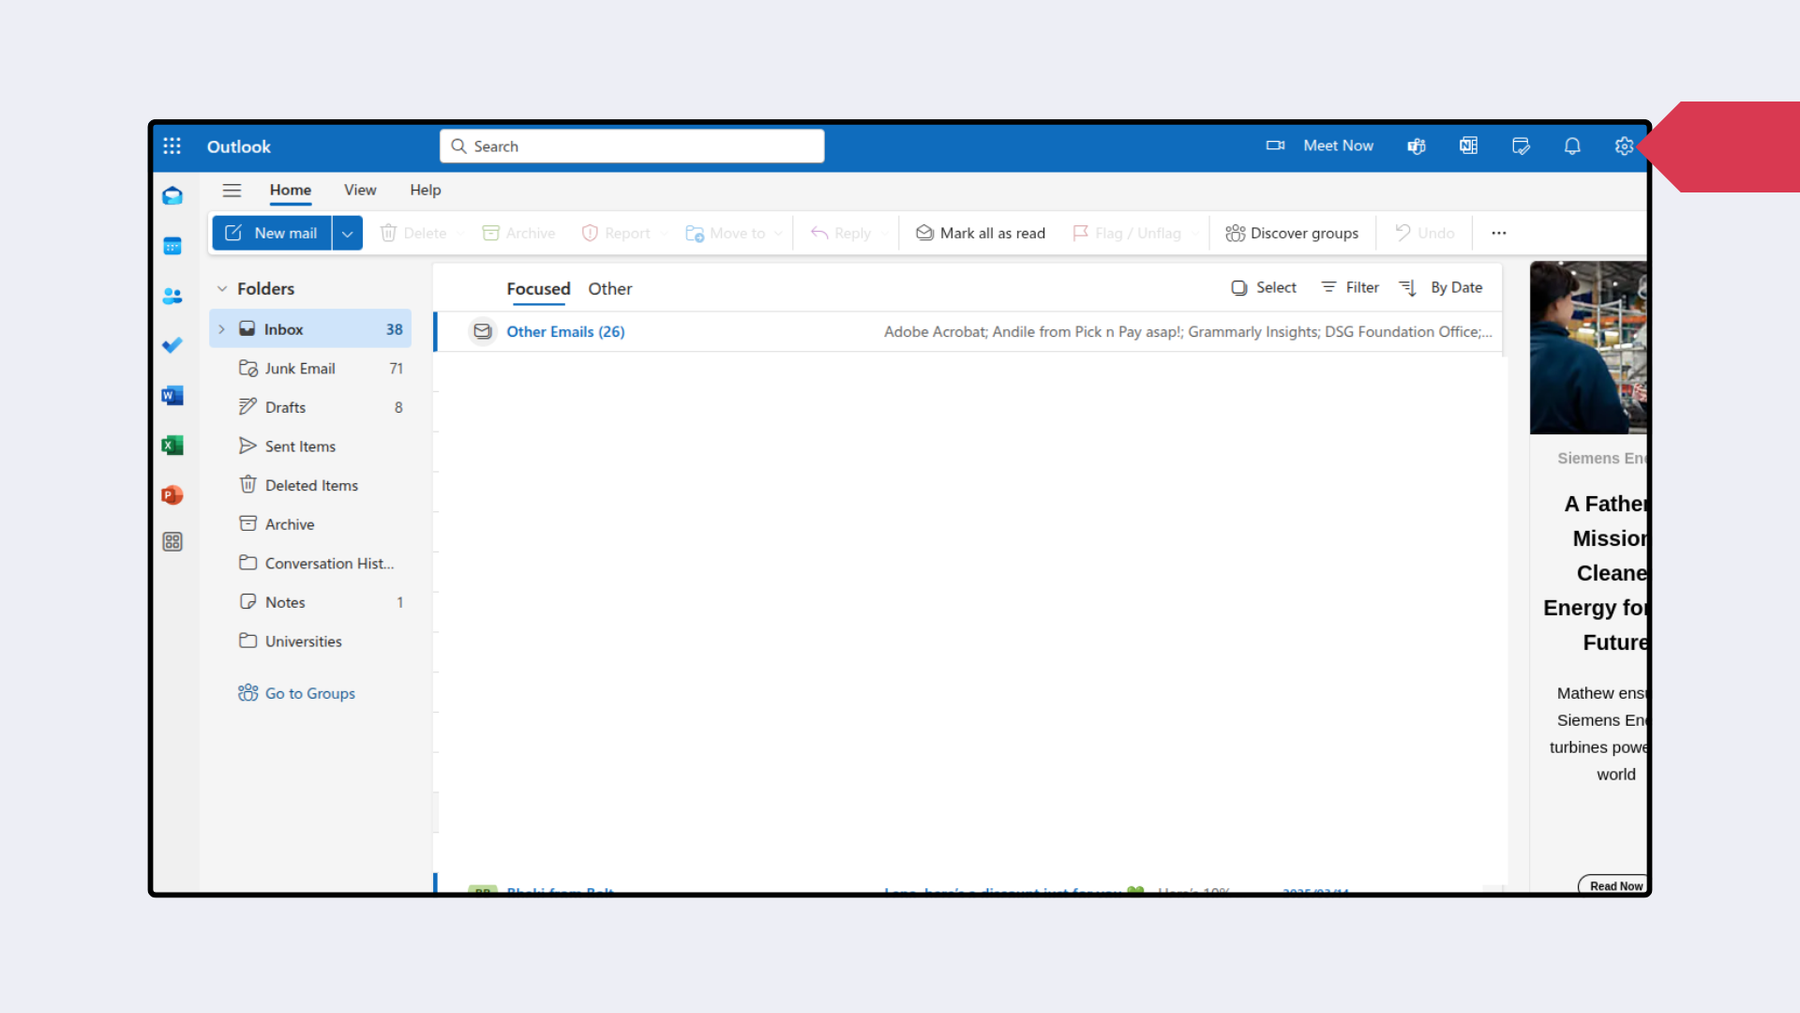
- Click on the setting gear icon in the top right corner
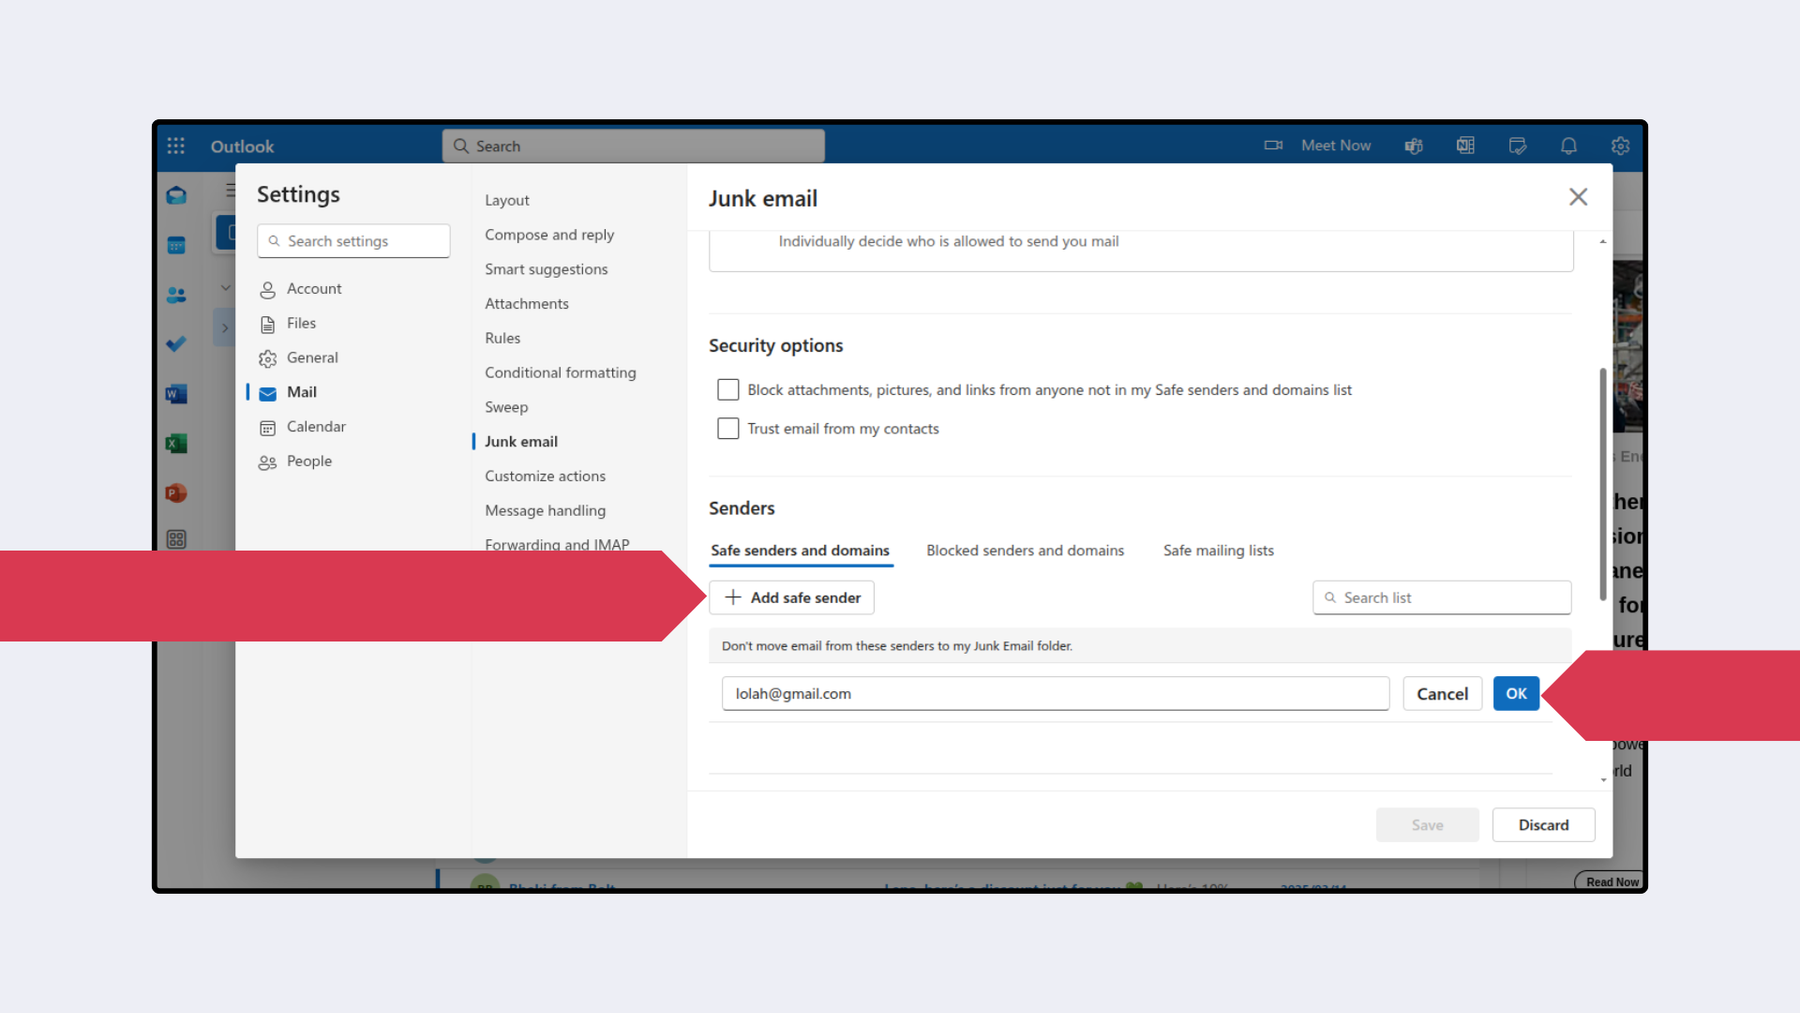
- Under Mail settings, go to Junk email
- Under Senders, click Add safe sender
- Enter the sender address or domain
- Click Ok
- Click Save
If you’re an Outlook user you’ll need to whitelist emails by creating a filter from within Outlook on a browser.
Whitelist emails in Outlook app on iPhone
On mobile devices, you can not create whitelist rules in Outlook, but you can add the email address that you wish to whitelist to your Outlook contacts.
From the Outlook Mail app on your iPhone:
- Open an email from the sender
- Click on the senders address
- Select Create New Contact
- Click Save
Whitelist emails in Outlook app on Android
From the Outlook Mail app on your Android:
- Open an email from the sender
- Click on the senders address
- Select Create New Contact
- Click Save
Whitelist emails with privacy - here’s how!
While you may feel good about having whitelisted an email in Gmail or Outlook, you will feel even better when whitelisting emails - in privacy with Tuta Mail.
Around the world people are saying no to Big Tech by deGoogling, and choosing privacy-first solutions like Tuta Mail and Tuta Calendar. Tuta Mail comes first in private email providers and it is the best Gmail alternative for privacy, or as TechCrunch said, the “Encrypted Gmail alternative”.
Privacy and security are essential in today’s day and age - especially for confidential communications in your mailbox. And Tuta Mail gives you exactly that. Tuta Mail is a free open source email and calendar provider based in Germany that secures your entire mailbox end-to-end with post-quantum encryption.

