How To Make Your Facebook Private: Yes, It Is Possible.
Whether you've been an active user for 3 months or 10 years, find out why increasing your privacy on Facebook is a must!
The Silicon Valley Tech giant knows more about you than you could ever imagine. Now it’s time to make your Facebook private and protect your personal data! Read on to find answers to these questions: How can I jack up my privacy in a few steps, how to hide my Facebook from the public or even better – how to delete my Facebook account completely.
Facebook, now owned by parent company Meta, has been around for years. Over the years, they have drastically increased their reach and become increasingly invasive into the private lives of their users. Facebook is a platform that knows more about you than you know about yourself, and the scary part is that they not only monitor and watch your actions while using the app, but even when the app is closed. It’s a complete invasion of people’s privacy and their practices violate your human right to privacy. Whether you’re new to Facebook, or one of their users who has stuck around with your account since the beginning, you should follow these steps to increase your Facebook privacy.
Table of contents:
- Want to see what data Facebook has stored about you?
- How to view your Facebook account data
- How to download all your Facebook data
- How to increase your Facebook security
- Take control of your privacy settings
- The best solution: Delete Facebook
- Conclusions
Want to see what data Facebook has stored about you?
Due to the General Data Protection Regulation (GDPR) people have the right to access their personal data, and companies like Facebook have to comply with these European privacy laws. Luckily, this means you can download all the data Facebook has collected about you since you registered and find out whether you get so creeped out by the mass of data the tech giant has on you that you will want to know all the steps it takes to make your Facebook account private. Residents in the US unfortunately don’t benefit from the GDPR.
How to view your Facebook account data
To see what data Facebook has collected from you over the years follow these steps:
- Log in to your Facebook account
- Click on your profile icon and select Settings & Privacy
- Click Settings
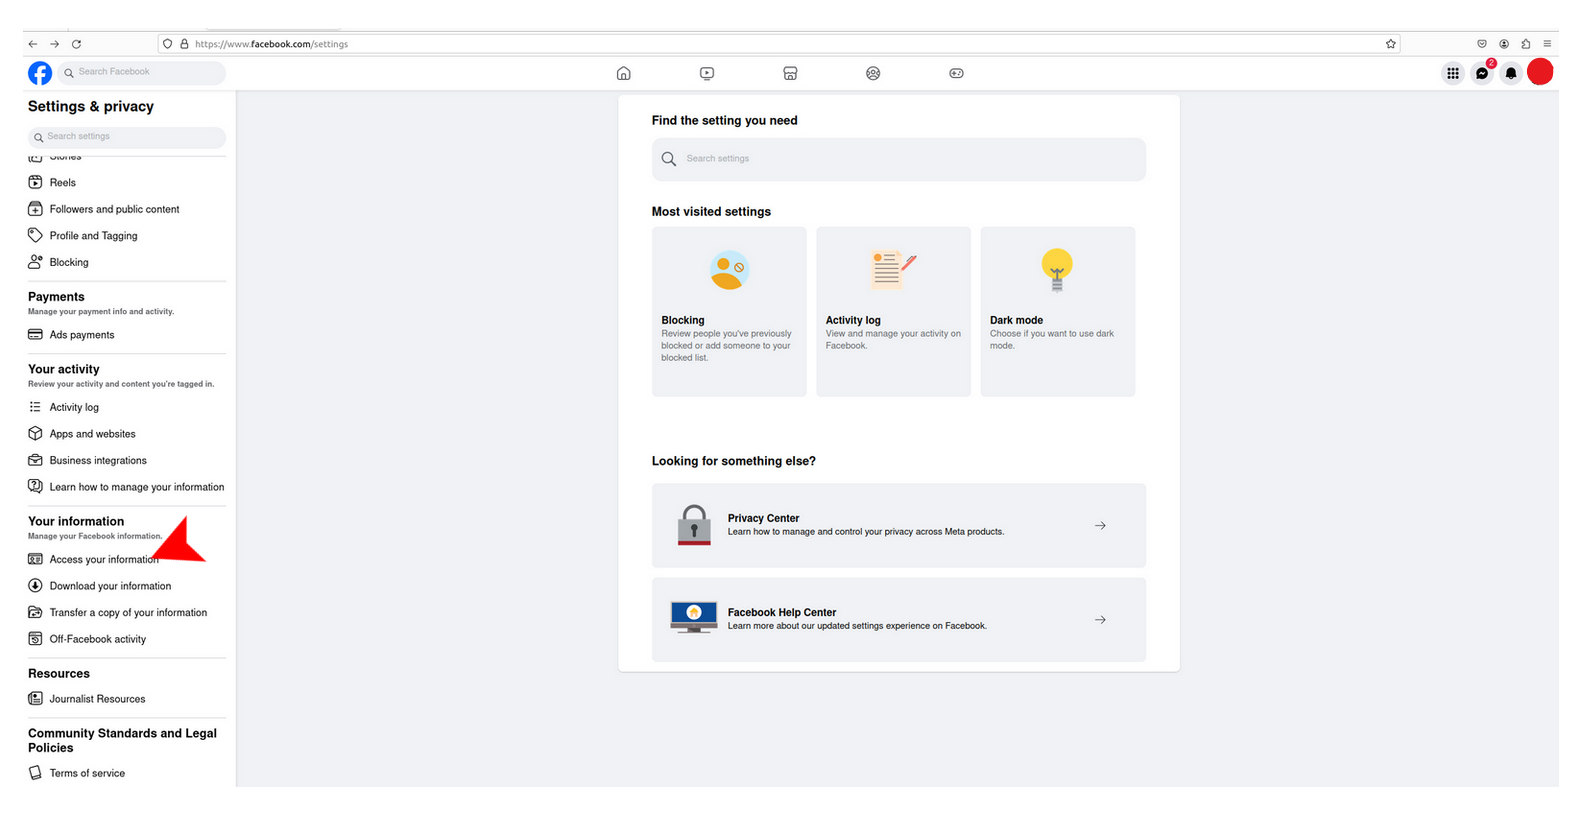
- Scroll down to Your Information
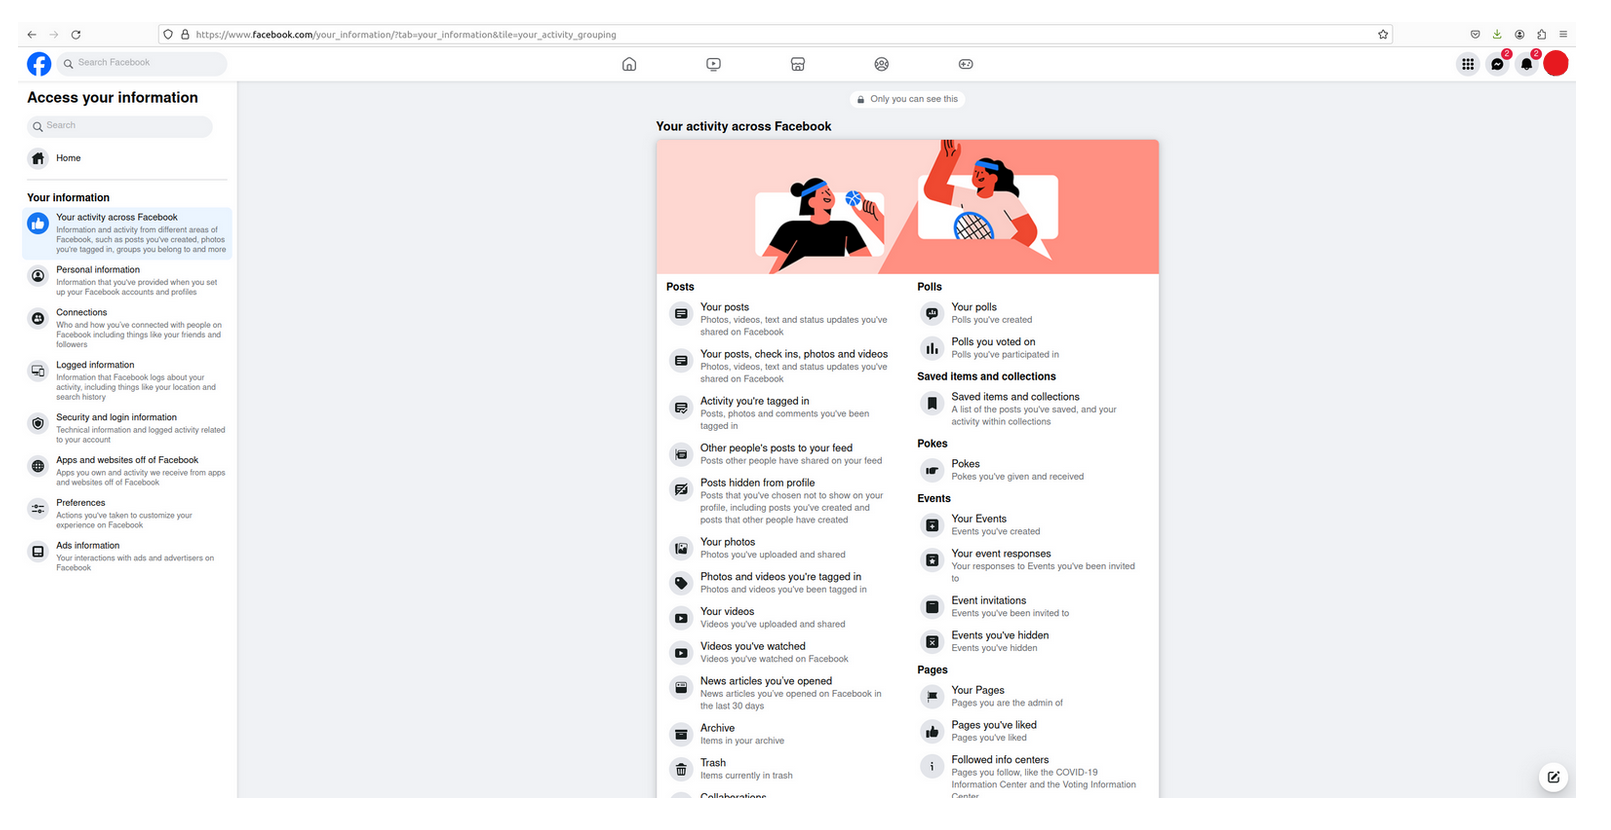
- Click Access Your Information


- Follow the prompt, and click Continue


Now that you’ve opened Access your Information, you’ll be able view categorized lists of all the information that Facebook has collected about you. This information can be viewed by category.
How to download all your Facebook data:
Now that you’ve viewed what information Facebook has collected, you can also download a copy of your data. This allows you to have all the data easily at hand, offline. Without using the app. It’s also advisable to download this information if you’d like to permanently delete your Facebook account, but still keep the things you’ve shared over the years like pictures. Be warned - going through everything is like going through a nostalgic time capsule of the past!
Follow these steps to download your data:
- Click on your profile icon and select Settings & Privacy
- Click Settings
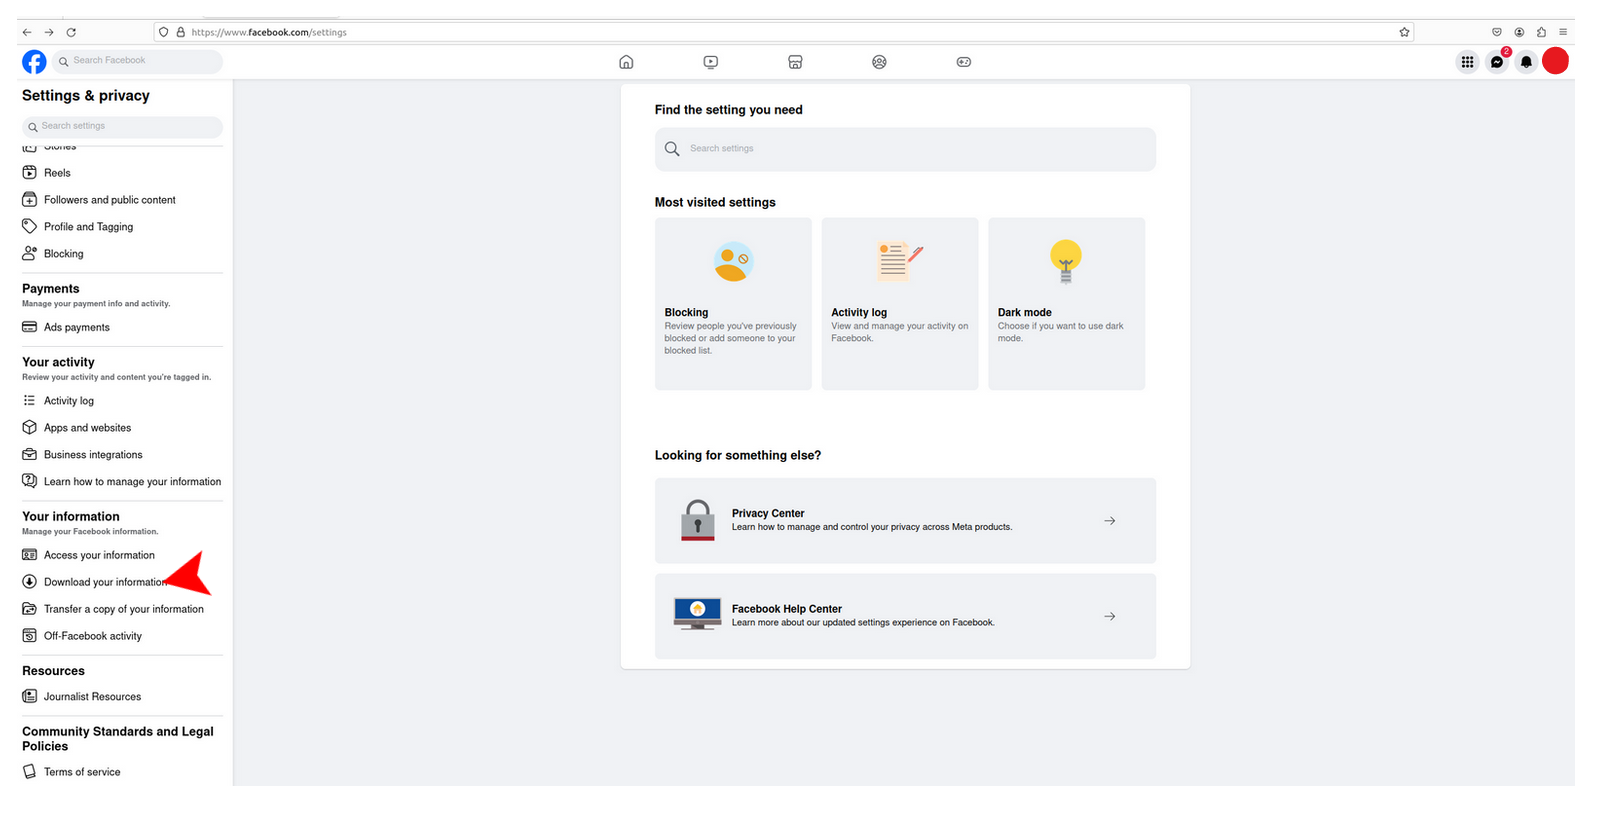
- Scroll down to Your Information
- Click Download Your Information
- Follow the prompt, and click Continue


- Click Request a Download
- Select which account’s information to download.


- Click Complete Copy.
- Choose the date range of information you’d like to download.
- Under Notify, you need to ensure the email address is correct. This is the email address you will be notified to.
- Select which Format you’d like this to be downloaded in. If you’d just like to view the data, we’d recommend downloading it as an HTML file. If you plan to export this data to another service, we’d recommend downloading it as a JSON file
- Under Media Quality select what quality (low, medium or high) you’d like to download this in. We’d recommend selecting a high quality download if you’re planning to delete your account and take your media files with.
- Click Submit Request. Your file will now be processed. Note that the time is takes to create this file is dependent on how much information there is and the quality you’ve selected.


- When you’ve received the notification that your password protected file is ready for download, follow the prompt to enter your Facebook password.
- Download the file.
Once the download is complete, you should have a zip file containing the Facebook data, from the date range and quality you selected. If you decide to delete your Facebook account, you’ll still have this data free to keep forever.
Tips for securing your account
Now that you’ve downloaded, and gone through the masses of data Facebook has collected about you over the years you may be in a panic and you might be wondering how to make your Facebook private, how to up your security and privacy ASAP.Don’t worry! We’ve got you covered. The next thing you’ll want to do is improve your account security to ensure that cybercriminals can’t hack your account and gain access to your personal details. If you don’t secure your account, it’s relatively easy for malicious attackers to hack into it and steal and abuse your personal data.
How to increase your Facebook security:
- Update your password: If your password is short and simple and possibly the same password as your other online accounts you will need to create a much longer and complex password. We suggest downloading a password manager which can store and create unique, complex passwords for all your accounts.
- Turn on two-factor authentication: Until an unfailing biometric alternative comes out, passwords remain necessary. Despite previous advice on crafting robust passwords and using password managers, the reality is that many individuals still opt for weak credentials. That’s why the most effective solution for this issue is to use two-factor authentication (2FA), and best a hardware key (U2F).
- Review what devices your account is logged into: Facebook is aware of the devices and locations you usually log in from. We recommend reviewing all the devices your Facebook is currently logged in from and logging out of the devices not necessary or no longer in use.
- Enable Facebook notifications: We suggest enabling unrecognized login notifications. This means that you will receive a notification when someone logs into your account from a new or unusual device or location. You can also choose where you’d like to receive the notifications to.
Take control of your privacy settings:
Now that you’ve upped your security, you’re less at risk of external attacks but your information and posts are still not necessarily private within the app. There are many different privacy settings you can enable and adjust in the settings menu. It’s highly recommended that you review your settings to increase your privacy on Facebook, allowing you to choose what information you want Facebook, your friends and the public to be able to see.
Privacy setting you should review:
- Who can see your activity: under privacy settings you can choose who see’s all your activity on your Facebook profile. You can choose to set it to just you, your friends or public. We recommend setting it to friends only.
- How people can search and contact you: under How people find and contact you section, you can choose how easy or difficult it is to find you on Facebook. In these settings, you can also control if your profile can be found through searches on search engines like Google or Firefox.
- Disable location settings: on your mobile device, you can enable or disable your location history. Remember that when you use Facebook’s mobile app it tracks you, and it even tracks you when you don’t have the app open. We recommend, deleting your Facebook location history as well as disabling this feature.
- Review the Apps linked to you Facebook account: Review what apps and websites are linked to your Facebook account. Remember that each time you log in with your Facebook account, you’re giving away your data! In the settings menu you can also disable the app and website feature so that you can no longer sign up or sign into apps or websites using your Facebook account.
- Control the ads Facebook shows you: While you can’t completely stop Facebook ads, you can update your Ad Preferences to get ads that are more relevant to you. In addition to updating your ad preferences, you can download an ad-blocking program which will ensure you stop seeing ads generated by Facebook. After all Facebook (and also Google) make you pay for their free services by showing you ads


While you can increase your security and privacy on Facebook, the sad truth is that as long as you have an account you are being tracked and monitored, your data is being taken and you are getting ad-targeted.That’s why removing Facebook from your life permanently by deleting it is the best solution.
The best solution: Delete Facebook!
We’ve given you some tips on how to make your Facebook more private and jack up your security, but you may still not feel safe and convinced that your privacy is being respected. We don’t blame you! We don’t think it is either.The question you probably have is “How do I make my Facebook completely private?” The best solution is deleting Facebook all together!
Before deleting your account, we’d recommend downloading all your Facebook data. This means you can save all your photos, and other important information to your computer. The steps for downloading your Facebook data can be found above.
After downloading your data, you will also need to review which third-party apps are linked to your Facebook Account. These apps use your Facebook credentials to log you in, so it’s necessary to add a different way to get into these accounts. In the settings menu, you can view which apps and websites are linked to your Facebook and from there add an alternative email, for instance a Tuta Mail address, and password as your login option to each linked website or app. If you don’t create new log in methods for these, you will lose access to them once you’ve permanently deleted your Facebook Account.
To delete your Facebook permanently follow these simple steps:
- Click on your profile picture and select Settings & Privacy
- Click on Settings
- Go to Your Facebook Information
- Click Deactivation and Deletion
- Next, select Delete Account and click Continue To Account Deletion 6 Click Delete Account, follow the prompt to enter your password and click Continue
Once you’ve deleted your account, you will have up to 30 days to reactivate your account. After the 30 days, your account and all your information on Facebook will be deleted permanently. From the day of deletion, your information is no longer visible to the public, but this doesn’t mean it has been removed permanently from Facebook’s database. The company says that it can take up to 90 days from the day of deletion for them to permanently delete everything.
Conclusions
We’ve given you our tips to make your Facebook account private and if you still have your account, we recommend updating your privacy settings sooner rather than latter. While you can update these privacy settings, it doesn’t necessarily mean your data and information is safe – in fact, that’s far from true.Remember, Facebook is one of the largest private data collectors in the world so as long as your have a Facebook account, every tiny piece of information they can get their hands on, they take.
You can take your privacy back from big tech by signing up for a private email service like Tuta!

